One of the most important things many users wish to learn and master when photo editing is probably how to mask hair. If you can master masking hair, then you'll able to master most masking techniques. Using Corel PHOTO-PAINT X7 I will be showing you a method of masking hair in an image. This technique, in which I use the Grayscale Lens Object, will also work with versions X5 and X6 as well. If you are using a version older than X5 you won't be able to use the Grayscale Lens Object.
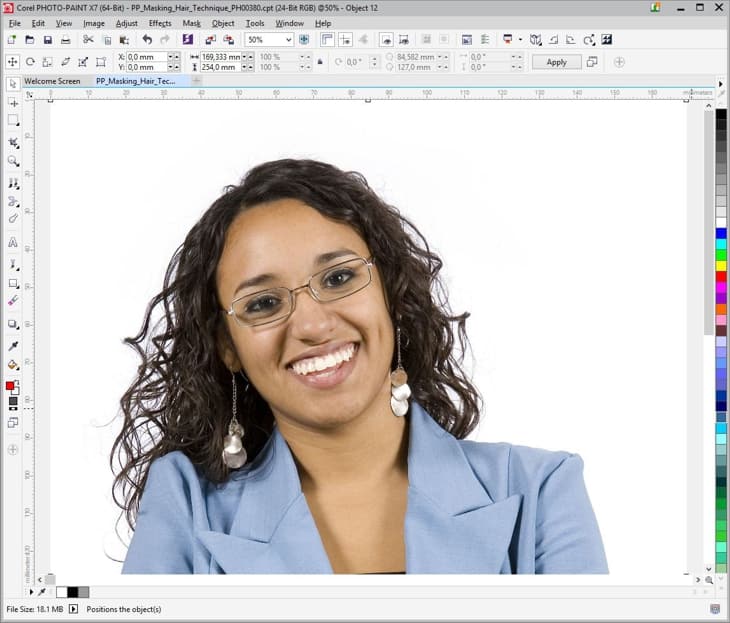
If you are a photographer, working with image retouch, or you are in a position to decide the background against which the person being photographed will be placed, I would suggest using a neutral, flat background. This way the hair will really stand out. But as we all know too well, this is not always possible. In this example I will be using a photo with a neutral background. And I will use a high quality image of at least 300 dpi. Be it RAW, TIFF, or JPEG, you need a high resolution image to get the best result if you are intending to do this professionally. I always save the image as a .CPT file before doing anything else.
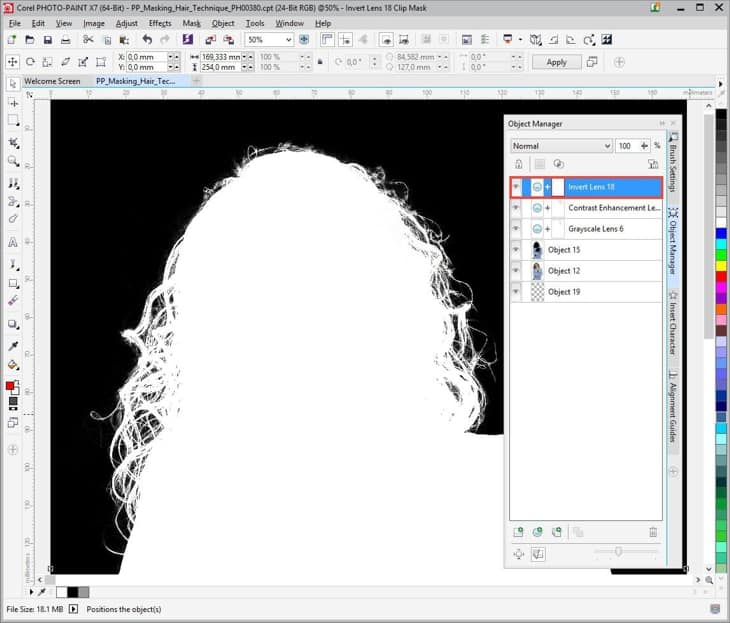
For this exercise I will be creating a mask of the entire person in the photo by turning the person into a black silhouette object against a white background. But before I can do this, I need to make the person in the photo as solid black as possible. And when I later invert black to white, the white background will become black. This will make it easier to catch all the hair I intend to keep. Yes, I know it is starting to sound a bit contradictory. But it will all become clear in the end. So let's start by making our subject black.
The quality of the image is crucial for the end result and why having a great, sharp photo is so important. But if all steps are followed properly, this works quite fast and the end result will be excellent.
I have both my Objects Docker (Window > Dockers > Object Manager or CTRL+F7), and my Channels Docker (Window > Dockers > Channel or CTRL+F9), activated.
I begin by using the Channels docker as a contrast guide, and click on the red, green and blue object layers in turn to see which one will offer the best contrast. And for this image it is the blue channel object.

Because I won't be using the Channels Docker anymore, I turn it off via the Quick Customizing button on the Dockers panel.

In the Objects docker I first create a Grayscale Lens object (Object > Create > New Lens > Grayscale), and choosing the Blue slider-bar, I drag this all the way to the left to make it as dark as possible.

And if I need to add even more contrast, I can adjust any of the other color sliders.
What I don't want to do is to destroy the finest strands of hair therefore I move the sliders slowly, setting the values of the sliders as dark as possible until I reach the point just before they start to destroy the details of the hair. It won't make it fully black, but the contrast will make it darker.
When this is done, I use the Contrast Enhancement Lens Object (Object > Create > New Lens > Contrast Enhancement), equally gently, dragging the sliders to make the image darker and always keeping an eye on the finer hair details – make sure you leave this intact. For this particular image I managed to drag the Input Value Clipping on the left to about 158. And clicked OK.

Before we move further I recommend duplicating the photograph Background object. (Right-click the Background Object > Duplicate).

Moving forward I use other tools that are very good at making the image either brighter or darker, but always making sure that the finer hair details are not destroyed.
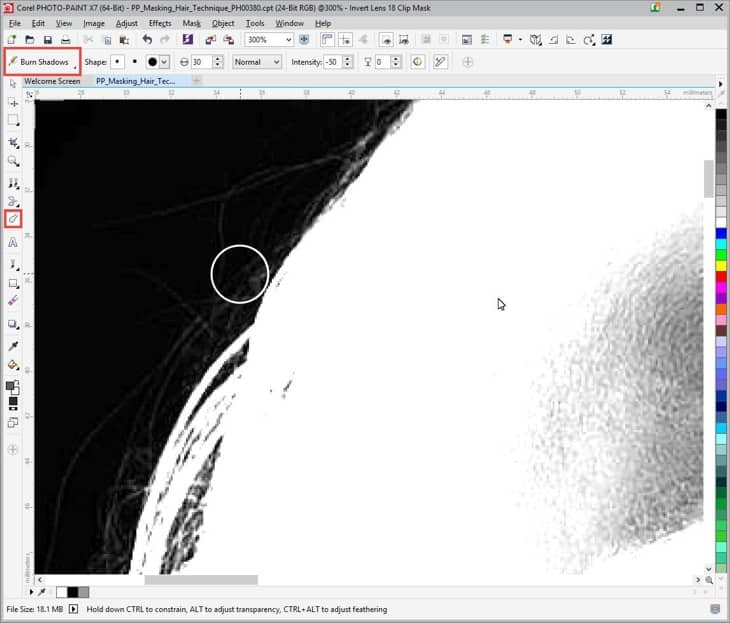
In the Toolbox I choose the Effect Tool > Brush Selector Category > Dodge and Burn, and start with Dodge > Dodge Highlights.

By using the tool on the white areas I can move very close to the contour of the person without damaging it too much. And because the background itself is pretty bright already, it is even easier and I don't have to work on the background too much. If I use too much of the Dodge effect I might affect the hair a bit too much. So therefore I recommend dabbing softly with the tool instead of painting in strokes ‒ preferably with a graphic tablet and pen ‒ when you work the dodge tool over the strands of hair.
Additionally I check to see if the default tool setting is ok for the job. If I need more sensitive result I choose a nib and setting I feel is most suitable. Most of the time though the default setting works just fine. Also remember that when you work with Dodge and Burn tools, each stroke you make (when overlapping previous strokes), will affect those strokes as well.
When I am done with the highlights, I use the Dodge > Burn Shadow effect to darken the dark areas and make the person more of a silhouette. And by doing this I will affect the dark areas instead of the bright, white areas. Because I don't have to be so sensitive in the main areas of the silhouette I can simply switch tools and use the ordinary Paint tool (Toolbox > Paint Tool), and paint black. And then back again to the Dodge and Burn tools. To be extra careful, change the value of the intensity of the shadow effect in the Property bar so that the shadow isn't too hard. The default setting is -50. So try set the intensity around -23. This value of course depends on the quality and type of your photo.


It is better to paint the Burn Shadow on top of itself in multiple strokes on the sensitive areas, and that way work yourself forward to a great silhouette. It's otherwise easy to damage the fine areas, such as the hair. Simply put: don't stress it. Be gentle and it will give you the best results.
Now when I am almost finished, I like to double check to make sure that there is nothing left over that I missed using dodge and burn and which could later cause problems. Or, I can further enhance details by using more dodge and burn.
For this I use the old trick of inverting the image colors, by choosing an Invert Lens Object (Object > Create > New Lens > Invert). It will reveal any significant errors most of the time. And if needed, I dodge and burn once again while in Invert Lens mode.

Finishing off. When all this is done I simply create a Mask of the silhouette (Toolbox > Magic Wand Mask tool). I created the mask for this image by choosing a Mask tool and in the Property bar I chose Additive Mode (the green + icon), and set the tolerance level to 30, which works for my image.

Finally, copy and paste the Mask on top of the original photo (Paste > Paste as New Selection), and cut out the person in the original photo, and paste it into another image.
Finished.

Always remember, the better the quality of your original photo, and the more carefully you follow all steps to create the silhouette, the better the end result will be. Especially when you finally use the Mask to capture the fine hair details. All this might sound obvious but it so easy to make mistakes by stressing. And a bad or low resolution image will most definitely dodge and burn too much of the finest hair and result in a poor mask. With patience and a steady hand you'll get a fantastic result.