Creating a Seasonal Greetings Card with CONNECT and CorelDRAW X7
By Suzanne Smith
In this tutorial I would like to show you how to use the wealth of content included in the CorelDRAW Graphics Suite X7 to quickly create a personal Seasons Greetings card.
![]()
Step 1 - Collecting your assets in CONNECT
We are going to start by gathering images and graphics that might work for our card by using keywords in CONNECT to search for content.
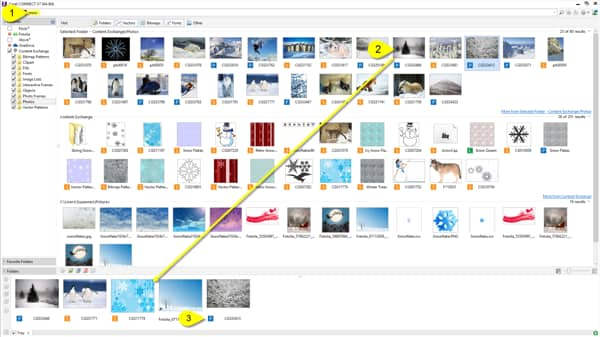
- Launch CONNECT, either as a standalone application, or by opening the Connect and Tray dockers in CorelDRAW X7 (Window > Dockers > Connect and Tray dockers). With all filters enabled (Folders, Vectors, Bitmaps and Fonts), in address field at the top of the window type in the first search word 'snow'. Hit Enter.
-
Depending on which search locations are activated in the Libraries and Favorites panels on the left, CONNECT will now present you with a selection of snow-themed images and vector graphics. Also, if you perhaps have a photo of your own snowy garden that you want to use, this can be dragged from outside of CONNECT to the Tray too!
![]()
- Drag any elements that you might like to use to the collection tray at the bottom of the screen. (Note: Images and Cliparts carrying an S-icon are included in the Standard CorelDRAW Membership, those with a P-icon are available only to customers with a Premium Membership).
- Let's do another search by replacing the search word 'snow', this time with 'Santa'. Drag any suitable cliparts to the Tray.
- I grabbed elements from other Clipart folders, dragged them to the Tray and ended up with a collection of graphics and images ̶ mostly from CorelDRAW Graphics Suite's Extra Content but also a stock photo ̶ to experiment with.
![]()
Step 2 - Creating the card design in CorelDRAW X7
Now that we have all our creative assets, it's time to get started on the card design itself.
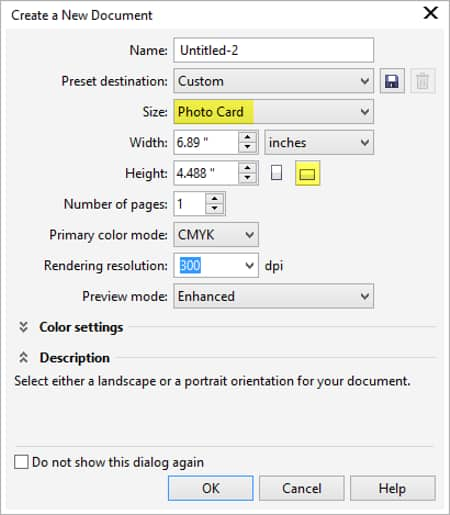
- Open a new CorelDRAW file: File > New… (Ctrl+N).
- In this case I have chosen a photo card page size in Landscape format, but you can of course, choose the paper size best suited to your purpose.
![]()
- In CorelDRAW, I now click on the Quick Customize icon to open up the Dockers selection, and set a check next to the Tray docker to open it.
![]()
- I first imported a background image by dragging the image from the Tray to the document.
- The image is much larger than my card and needs to be resampled. To do this I click on Bitmaps > Resample.
- In the Resample dialog box, I leave the resolution at 300 dpi if I want to have my card professionally printed. But if I'm printing the cards myself at home, then a resolution of 150 dpi would probably suffice.
- I now change the image dimensions (width and height), to roughly match my card size. I don't uncheck the box for maintaining the aspect ratio, as this could result in the image becoming distorted. I would rather leave it a little bit larger with the correct aspect ratio and just crop off the excess afterwards. For this reason I'll be setting the width to about 7”.
![]()
- Click OK then press 'P' on the keyboard to center the resampled image on the page.
- Now go into Wireframe view (View > Wireframe), and using the Crop tool (Toolbox > Crop tool), and crop the image to the size of the page (In the Standard toolbar at the top of the screen below the Menu bar, turn off Snap To > Objects for this, and check snap to Page. This will make cropping to page size easier). After cropping, disable snap to Page and re-check snap to Objects.
- I now want to create a dark border around my image which will serve as a background for the decorative frame that I am going to include. Double-click on the Rectangle tool (Toolbox > Rectangle tool), to create a page frame.
- In the Object Manager docker you can see that the frame is sitting below the bitmap. Drag it above the bitmap.
- Using the Color Eyedropper tool in the Toolbox, I sample one of the darker greys in the background image then click inside the frame to fill it with color.
- Press the '+' key on the numerical keypad (or use Ctrl+C/Ctrl+V to copy and paste the rectangle back in). Fill the second rectangle with white and holding down the Shift+key, resize inwards to create a grey border.
- Select both rectangles and click on the Simplify command from the Property bar.
![]()
After simplifying, remove the white rectangle and you should be left with this grey frame.
![]()
- I now want to add a festive frame to my design, so I drag the vector frame that I found in CONNECT to the page.
- This frame is of course too large and in portrait format, but being vector, I can simply add a 90° rotation in the Property bar > press 'P' to center the frame on the page > then holding down the Shift-key, I can re-size the frame inwards without any loss of quality.
Dragging the decorative frame to the document.
![]()
Frame after rotating 90° and resizing.
![]()
- I am going to replace the color of the leaves in the border, which don't really match the tone of the background, with another, more suitable color by using the Find and Replace command (Edit > Find and Replace > Find Objects…).
![]()
- In the Find and Replace dialog box, select Begin a New Search > Next.
- Click on the Fills tab and choose Uniform Color.
- On the next page click on Specific Uniform Color Fill and use the Eyedropper tool to pick up the green of the leaves in the frame (this is the color that will be replaced).
![]()
- Click on Next > Finish > Find All > say Yes when asked if the objects can be ungrouped.
- With all green leaf objects now selected, choose a darker, more fitting green from the Color Palette.
![]()
- Don't forget to save your document now and again (Ctrl+S), especially when working on a longer project.
- Because all the elements of my design are looking rather 'flat' and I would like to add a bit more depth to it, I am going to select the grey border and choosing the Drop Shadow tool from the Toolbox, I am going to apply a shadow to it (Flat Bottom Right).
![]()
- I am not going to reposition the shadow, instead, using the command CTRL+K, I am going to break the shadow and the border apart. This will then allow me to resize and reposition the shadow, so that it appears only on the inside of the border and not around the outside only. After breaking the shadow apart and resizing and centering it I now have a shadow along the inside edge of my border.
![]()
- The next step is to grab another of my cliparts from the Tray docker – Santa!
- I go back to the Drop Shadow tool, and with Santa resized and selected, I select the Perspective Bottom Right shadow from the drop-down list on the Property bar, adjusting the interactive handle until the shadow is in the right position.
![]()
- It's now time to add some text to my design. To find the best font for the job, I am going to open the new, Font Playground docker by clicking on either: Text > Font Playground, or just opening up the docker directly using the Quick Customize button on the dockers panel.
- Once open, I replace the default text in Font Playground with my own: “Seasons Greetings!”
![]()
- I can now select each font panel in turn and choose an alternative font from the Font List.
- Once I have a few suitable candidates, I just need to drag these to my card to see which one works best.
![]()
- I notice that two of the fonts that I selected ̶ Alize and Gabriola ̶ offer me quite a few alternative stylistic sets (the alternative stylistic sets available within an OpenType font, depend on what the font manufacturer has built into that particular font).
- To see which styles are available, I simply select the text and click on the black arrow that appears below it, whenever alternative styles are available. (Note! You can only select one line of text at a time when applying alternative stylistic sets).
![]()
- I think I'm going to go with Gabriola > Stylistic Set 7 and remove the other text samples.
![]()
- Finally, to make the text pop out a little more, I go back to my Drop Shadow tool, and choose a Small Glow from the Presets in the Property Bar.
- I leave the Drop Shadow Opacity at 100%, but lower the Shadow feathering to 8, and change the glow color to white, to get a more defined shadow.
![]()
- You can of course add as much text as you like to your card to personalise it even further. Other than that, our card is finished!
![]()


