• How to rebuild a bitmap as vectors with a winding figure (symmetrical shape), using CorelDRAW X7 capabilities.

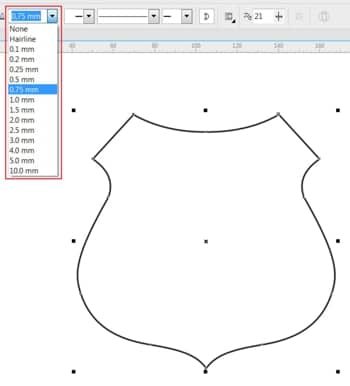
  • In this example we will be using a fake CorelDRAW logo (as a sportive badge), which is why we will be using an irregular shape with straight and curved lines, but with symmetry on both sides (right and left).

  • The techniques applied in this example can be adapted to other shapes such as bottles, cups, flower pots, sports teams’ logos, shields or any other symmetrical objects.

  • Steps:

    1. Import figure (bitmap) to workspace: Go to: File > Import (Ctrl + I) and press Enter to center the image on the page.

    2. Select the object and click on the Transparency Tool (Toolbox > Transparency tool) .

    3. After choosing a Uniform Transparency from the Property bar (see image below), lower the transparency of the image but leave it clear enough (*) to be able to use the bitmap as reference. Once transparency has been applied, this can be further adjusted using the small transparency slider bar that will appear beneath the image.

      (*) 70 is a good value, however it will depend on the contrast of the original image.

    4. Lock the image to prevent accidental movements. Go to (Object > Lock > Lock object). Or right-click the object and choose: Lock object.
      Note: When task is finish, Unlock object and delete bitmap used as reference.

    5. Add a vertical guideline (*) to the center of the image (select the guideline and hit P on the keyboard to place center page). Next, click on the Bézier Tool (Toolbox > Bézier Tool or key shortcut: Q), to add segments (as anchor points, applying them only to left half of the figure. Add nodes to the edge of the figure as below.

      (*) Select guideline and make sure to snap objects (View > Snap to > Guideline), is active. (You can also use the Snap To drop-down list from the Toolbar to select which objects to snap to).

    6. Click on the Shape Tool (F10), and select all nodes (indicated by blue circles), by dragging around them to marquee select them all.

    7. With the Shape Tool still selected, on the Property bar choose Convert to Curve.

    8. To edit the individual segments: Click and drag the ends of the Control handles (the blue control handles are indicated by red arrows – see below) and move each one in order to follow the edges of the figure. Repeat this action for each segment to properly adjust the perimeter based on the the figure we are using as a reference.

    9. Note the segment marked with the blue circle is, in fact, a straight line. In this case right-click the segment with the Shape tool and choose > To Line.

    10. When the left half has the desired shape, Select the Pick tool (Toolbox > Pick tool), and holding down the Ctrl-key, click on center boundary handle (indicated by the blue circle below). Then drag the mouse over to the right side still holding ,Control key. Release mouse right-clicking at the same time to duplicate the figure (shown here in green),which is now perfectly aligned with the left half (shown in red).

      Another method you can use (if you find releasing the mouse and right-clicking at the same time a bit difficult), is to select the left-side > hit the + key on your numeric keyboard to create a copy > then drag the copy over while holding the CTRL-key.

      Option to mirror:

      Finally, you can also use the mirror feature to flip a copy over to the other side. Select the figure, hit the + key on the numeric keyboard and click on Mirror horizontally icon on the Property bar. Drag the duplicated image across, snapping to the guideline, and align both halves. When dragging, hold down the CTRL-key so that the movement is restricted horizontally.

    11. Important! Before proceeding to next step, make sure that the two images are perfectly aligned (both abutting each other), and they do not have gaps between them – at the top and/or on the bottom. If this is the case, align the two sides correctly and join them so they are touching.

    12. With both parts perfectly aligned, select the "Smart Fill" tool (Toolbox > Smart Fill tool), and click inside the figure to fill it with any color you wish (in this example: yellow).

      To choose a color and/or an outline for the Smart Fill object, use the Fill-and Outline options on the Property bar.

    13. Click on filled shape (yellow) and drag to separate objects. Delete the background image (indicated by red dashed line below), after right-clicking on the image and choosing > Unlock object.

    14. Fill the vector object with white (or no fill), and apply the thickness to the boundary line as desired.

    15. Finishing:
      1. Add the horizontal rectangle over the main shape, select the Shape Tool (F10), and holding down Shift-key, click on left top handle and drag the mouse to round the corners.
        1. Once done, select the Contour tool from the Toolbox and drag mouse to create a contour (inside or outside).
        2. On the Property bar, determine number of contours and their distance from original path.
        3. Then, click on (Object > Break contour group apart).
        4. Ungroup objects (Ctrl + U).
      2. Repeat these actions with the shape that you created earlier.
      3. Add the vertical bars below the rectangle.
      4. Finish entering text and/or other elements and apply your preferred gradient colors.
      5. Apply a Lens effect, Drop Shadows and Transparencies to highlight some of the elements.
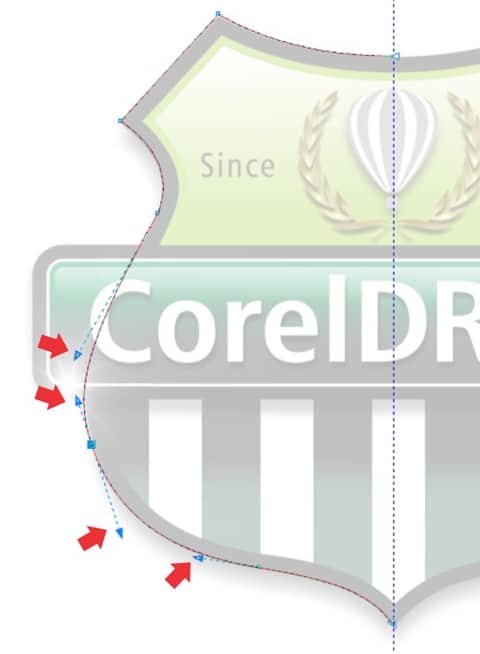
      6. (The figure below shows in red lines original shapes).

Tutorial provided by Silvio Gomes – Graphic Designer and CorelDRAW Master – June 2015