(Em inglês)
Powerful CorelDRAW Shaping Commands for Corner Effects
By Steve Bain
The applications and features described in this tutorial require CorelDRAW Graphics Suite X3 or newer to be installed.
The three new shaping commands available since CorelDRAW X3 enable you to apply corner effects to vector paths, eliminating what would otherwise be a time-consuming manual operation. You can now instantly apply fillet, scallop, and chamfer shaping commands to create curved, reverse-curved, or beveled effects at specified distances across an entire path or at the node level. These time-saving shortcuts will enable you to create a variety of complex effects for object corners, such as the one shown below.
![]()
In this optical illusion of an intertwining and overlapping path, a series of rectangular shapes were used as the framework for a continuous closed-outline object. The outline was thickened and converted to an object. Then, fillet and scallop commands were applied to specific corners (shown below). The overlapping illusion was created by using carefully placed white rectangles. Let's take a look at a few more practical examples and explore how these different effects can be applied in other common tasks.
![]()
Fillet for curved corner effects
The filleted corner effect applies uniform and concentric roundness around a point at a specific radius, enabling you to convert a sharp corner to a rounded corner. The filleted corner is a common design effect.
In the example shown below, an optical illusion is created by rounding one or more corners of a carefully placed series of rectangles. To create the illusion of bent wire or tubing, specific corners were filleted with values either equal to, or half of, the width of the rectangles. A white outline was then applied to visually separate the brown-filled shapes.
![]()
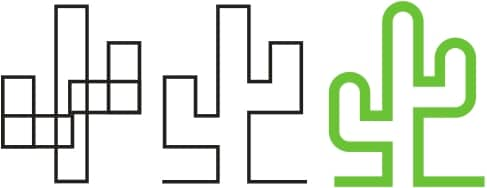
In the example shown below, the outline shape of a cactus was created from combined rectangular outlines. The welded rectangles were broken apart at the base and a simple thick outline was applied. The outer corners of the cactus branches were rounded by using the fillet command, which creates the effect much faster and more accurately than simply combining rectangles with rounded corners.
![]()
Scallop for reverse rounded corners
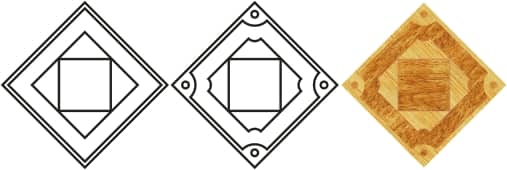
The scalloped corner effect instantly applies concentric reverse-rounded corners to objects that result in a seashell-like effect, which is essentially the opposite of the filleted effect. Like the fillet command, the scallop command can be applied at specific radius values. Although not as commonly used as the rounded corners, the scallop effect is equally as useful in eliminating the time required to manually create similar effects. In the example shown below, certain objects in this arrangement were given scalloped corner effects along with alternating bitmap fills to create a wood pattern tile.
![]()
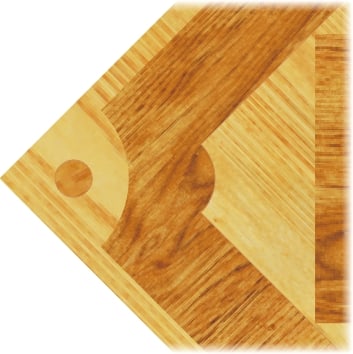
A closer examination (shown below) shows the shaping effect at the corners of the tile.
![]()
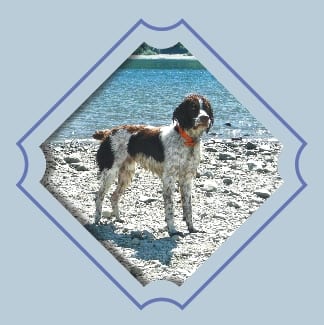
In another example of scalloped corners, this matted photo uses scalloped corner effects to frame a photo subject. To create the cutout shape, the rotated square in the
center was combined with a larger rectangle. The drop shadow applied to a duplicate object simulates the depth between the matte and the photo surface, while a copy of the original scalloped corner square was enlarged and outlined to emphasize the cutout shape.
![]()
Chamfer for flat corners
The chamfered corner effect applies a simple bevel concentrically around a point at a distance, enabling you to convert a sharp corner to a flattened corner. The chamfered corner is perhaps the most versatile in drawing, enabling you to quickly convert sharp corners to precise and uniformly angled corners with a single click.
In the example shown below, the teeth of a mechanical gear were created from a simple star shape. Using the Polygon tool, a 2-inch square, 20-point star outline with a sharpness of 53 was created and converted to curves. A chamfer shaping command set to a distance of 0.2 inches was applied to instantly bevel all corners on the object. By varying the object size, points, sharpness, and chamfer distance, you can use this same technique to quickly create any gear shape.
![]()
How corner effects work
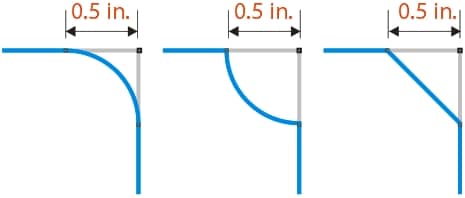
As mentioned earlier, fillet, scallop, and chamfer effects enable you to apply rounded, reverse-rounded, or flat effects (respectively) to the angled corners on an open or closed path. You can apply the effects at specific distances (shown below).
![]()
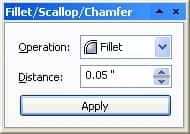
The effects are applied using the familiar docker interface (shown below), much like the trim, weld, and intersect shaping commands. To open the docker, choose Windows > Dockers > Fillet/Scallop/Chamfer. This simple docker includes an Operation list box to choose the effect style, a field to specify the Distance or radius, and an Apply button
.
![]()
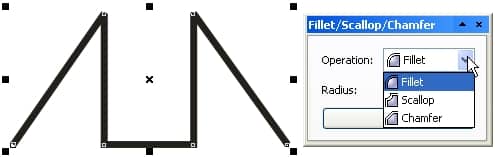
If you're new to applying docker effects, you can get your feet wet with corner effects by following these simple steps:
- Use the Pick tool to select an object. Choose a simple object comprised of straight line segments, such as a rectangle converted to curves or straight line segments comprising an open or closed path created with the Bezier tool.
- If it isn't already open, choose Window > Dockers > Fillet/Scallop/Chamfer to access the corner effects.
- Choose a style from the Operation list box, type a radius or distance value (shown below), and click the Apply button.
![]()
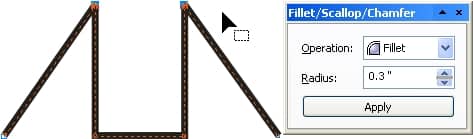
- That's it, you're done. Notice the corner effect you selected is applied to all points where corner nodes joining straight lines exist on your object (shown below).
![]()
Using the above steps applies the effect you selected across the entire shape. There is, however, a second method you can use to apply a more localized effect to specific points on your shape. This will enable you to selectively apply corner effects without affecting all corners at once. Here's how to do it:
- Use the Shape tool to create a simple object comprised of straight line segments fashioned into an open or closed path.
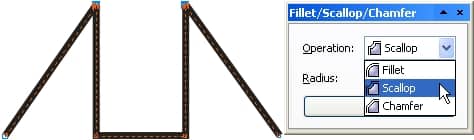
- Click to choose one of the path nodes or Shift-click to select multiple nodes on the object to make a node selection (shown below).
![]()
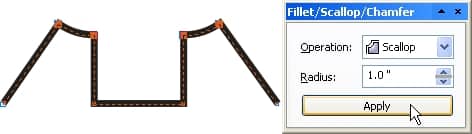
- On the Fillet/Scallop/Chamfer docker, choose a style from the Operation list box, type a radius or distance value, and click the Apply button (shown below).
![]()
- Your effect is applied (shown below). Notice that this time the effect was applied only to the corner node(s) you selected.
![]()
There are some considerations you'll want to keep in mind as you apply your corner effects. These include things such as the usual object suitability, practical
limitations, and alert dialog boxes you may encounter as you become more familiar with the Fillet/Scallop/Chamfer commands. Here are a few guidelines you may wish to follow before applying your corner effects:
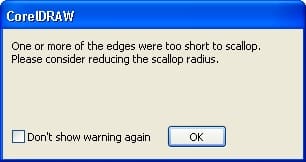
- Size matters (really) - If the distance or radius value you're attempting to apply to your object is larger than the object corner(s) can accommodate, the effect will not be applied. Instead, CorelDRAW will display a warning dialog box (shown below) enabling you to proceed with the compatible corner effects only, or decline the command.
![]()
- Use only straight segments - Corner effects can only be applied to corners joined by straight line segments. This means that if you attempt to apply a corner effect to an ellipse-shaped object or a shape involving curved segments, the corners involving the curve segments will not be involved in the effect.
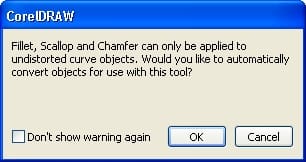
- Curve paths only please - Although the terminology may be confusing to vector-drawing newcomers, a curve path is simply a series of nodes joined by line segments that have no dynamic effects applied. Corner effects can only be applied to undistorted open or closed vector curve paths, which means that objects with distortions applied with the Interactive Distortion or Interactive Envelope tools and dynamic objects created with the Rectangle, Star, Perfect Shape, Artistic Media, or Text tools are ineligible unless first converted to curves. If you attempt to apply a corner effect to an object created with one of these tools, CorelDRAW will display a friendly reminder (shown below) enabling you to automatically convert the object or decline the command. You can easily convert any object to curves by right-clicking the object and choosing Convert to Curves from the pop-up menu, by choosing Arrange > Convert to Curves, or by using the Ctrl+Q shortcut.
![]()
- Control objects are compatible - You can apply corner effects to objects acting as control objects that have had effects applied with existing dynamic effect tools ¾ such as Interactive Blend, Interactive Contour, Interactive Drop Shadow, and Interactive Extrude tools. Provided, of course, that the objects are curve objects (or can easily be converted to curves).
- Corner effects are not dynamic - Corner effects applied with the Fillet/Scallop/Chamfer docker are not dynamic, which means you cannot edit the properties of a corner shape once it has been applied.
- Sticky docker values - CorelDRAW stores the last-used distance or radius value for each corner effects in the docker as the default. This means as you switch between corner effect styles, the values may change. It may be worthwhile to re-check your values before clicking the Apply button.
Like other invaluable effects in CorelDRAW, the new fillet, scallop, and chamfer shaping commands help you to solve common drawing challenges without compromising accuracy. Now that you've explored the possibilities, I'm sure you'll agree that working yourself into a corner doesn't get much better than this.
Steve Bain is an award-winning illustrator and designer, and an author of nearly a dozen books, including CorelDRAW®: The Official Guide.