1. Import your license
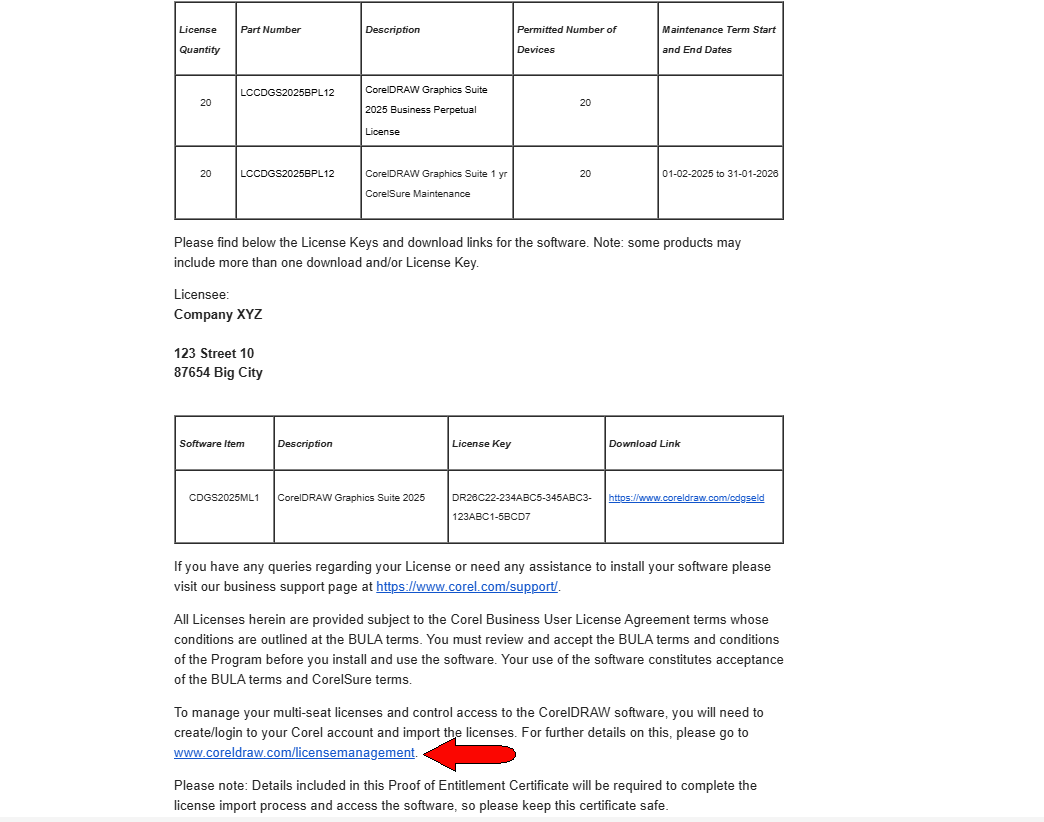
Once your organization purchases a CorelDRAW Graphics Suite volume license, the admin will receive an email containing essential details like proof of license, order number, and a license import code.
Here’s an example of what the email looks like:
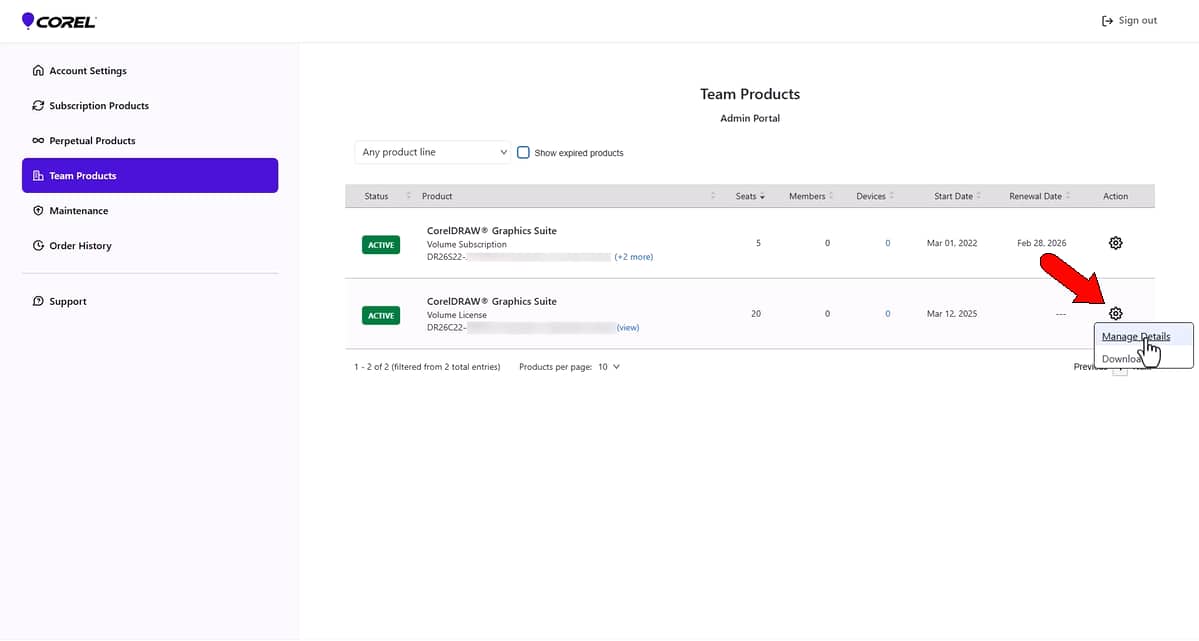
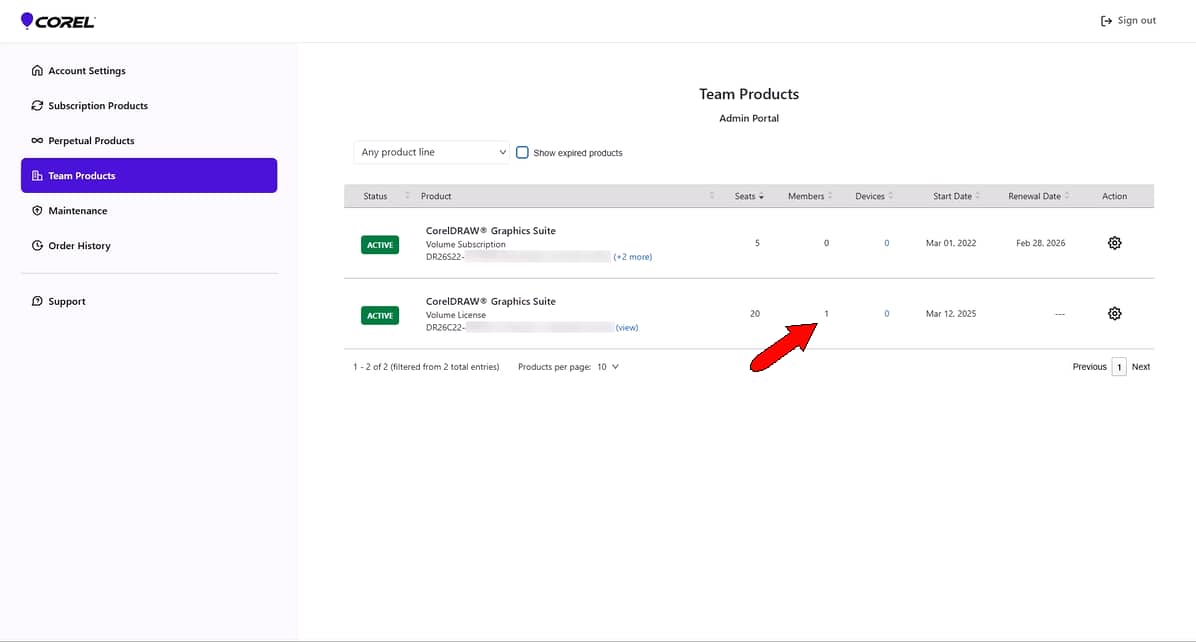
In the admin account, all imported products and licenses appear in the Team Products page.
Here’s what to do next:
- Click on the license import link provided in the email.
- Log in to your admin account and enter the license import code.
- Navigate to the “Team Products” page. Here, you’ll find all imported licenses, including the number of seats, serial numbers, and maintenance dates.
2. Assign licenses to team members
Now it’s time to get your team involved.
Here’s how to assign a license to a team member:
-
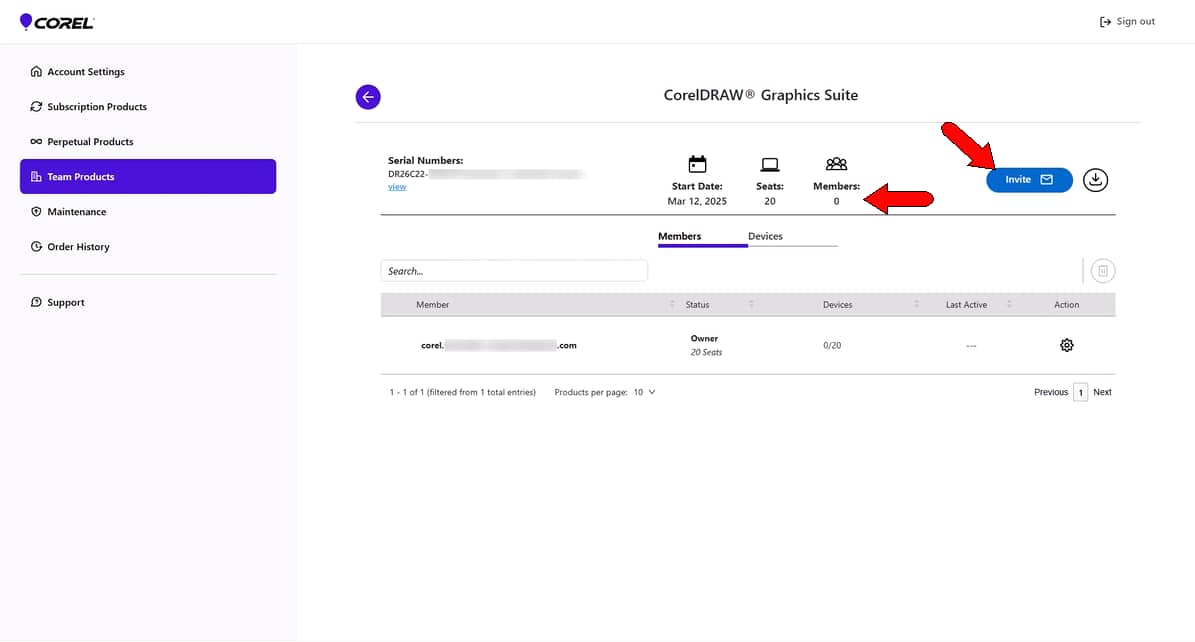
Click the “Action” icon next to the desired product and select “Manage Details.”
![Manage license]()
-
Choose “Invite” and enter the team member’s email address. You can invite multiple teams at once. Just click the space bar or add a comma.
![Add email address business license]()
-
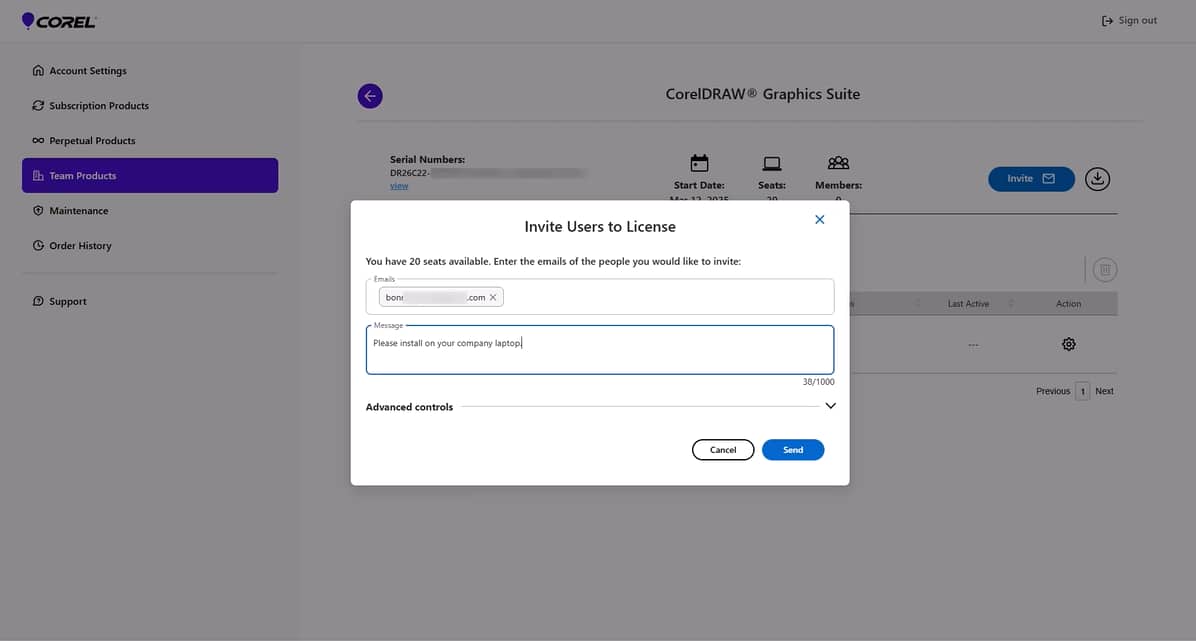
Add a personalized message (optional) and hit “Send”.
![Send invite business license]()
-
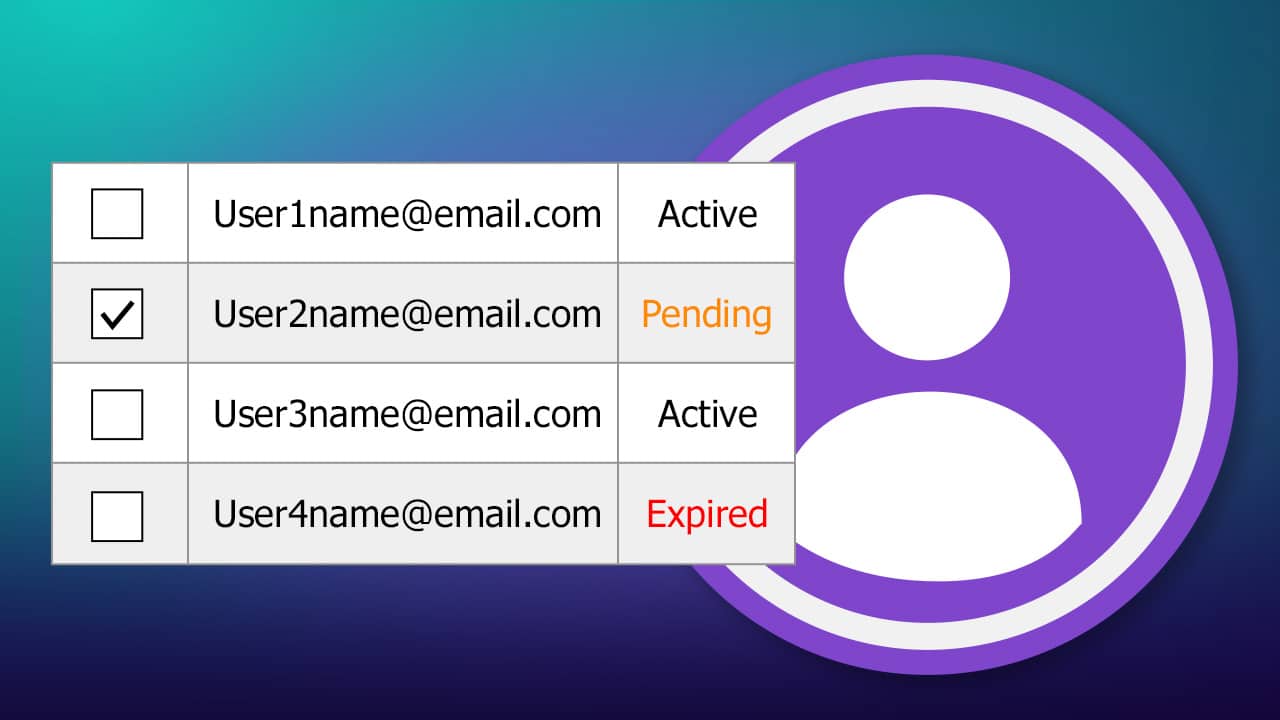
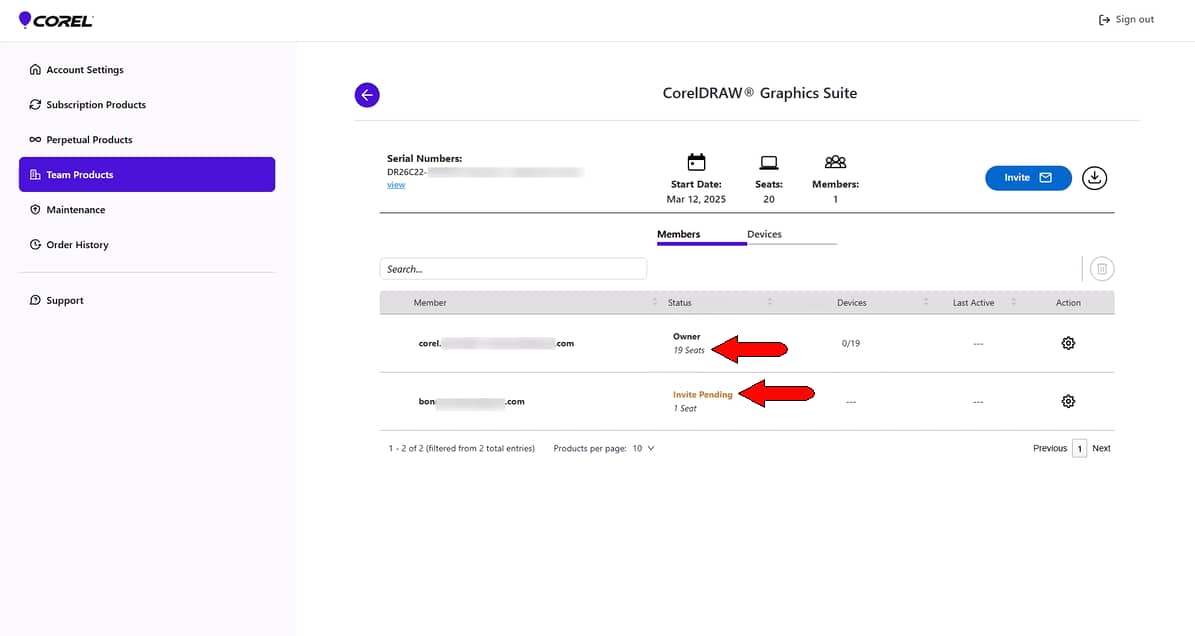
The assigned seat will now reflect as “pending” in your admin dashboard until the team member accepts the invite.
![Business license invite pending]()
3. Activate team members
Once a team member receives your invite, they’ll need to:
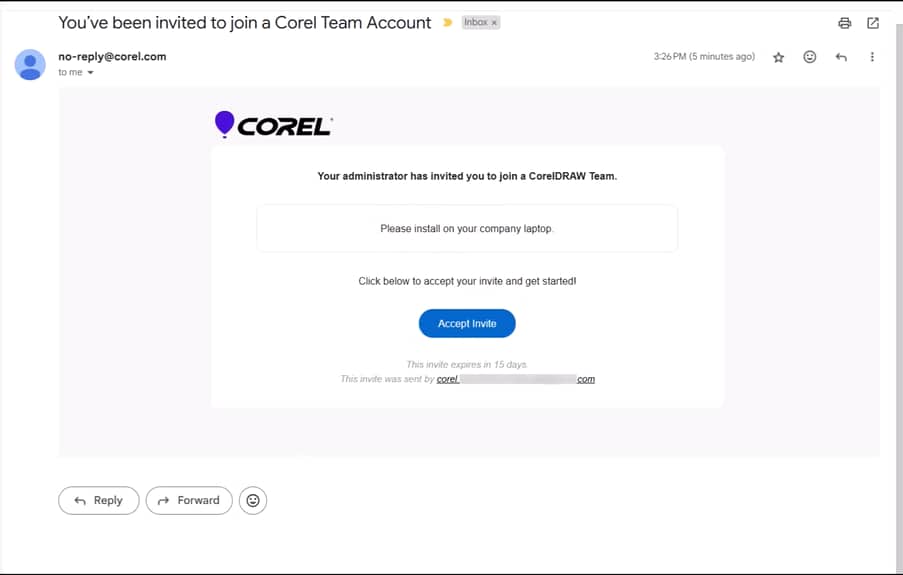
-
Open the email invitation and click the accept link.
![Accept link business license]()
- Log in to or create a new Corel account (note that the account email must match the invite).
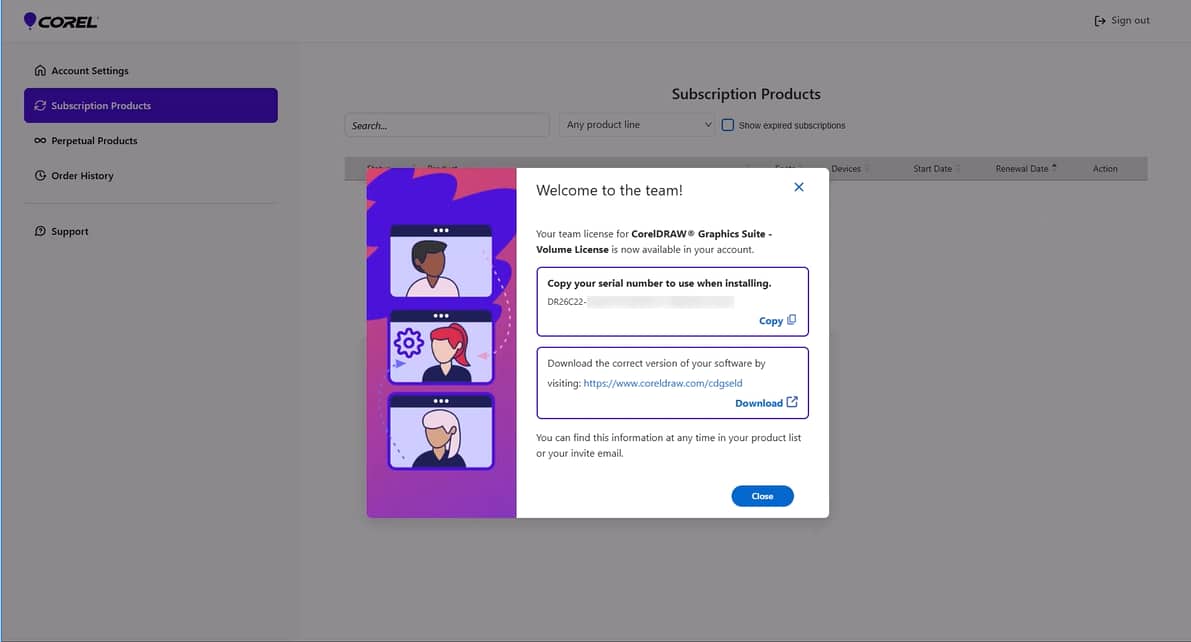
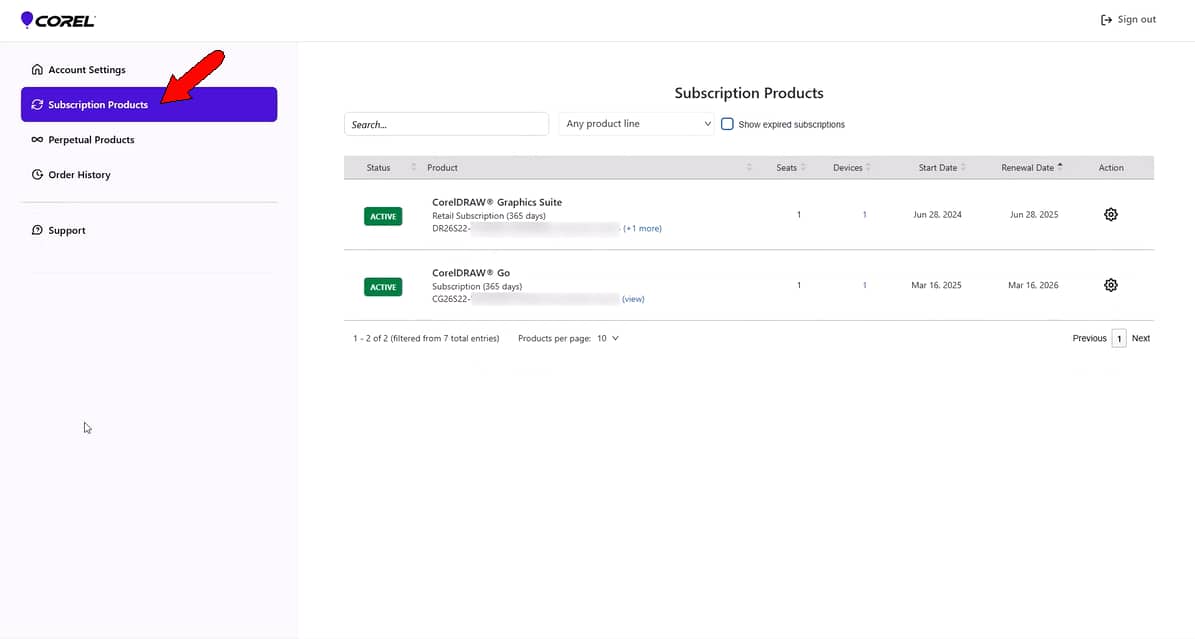
-
Access their “Subscription Products” page, find the serial number, and copy it.
![Subscription products page business license]()
- Download and install the product, using the assigned serial number to complete registration.
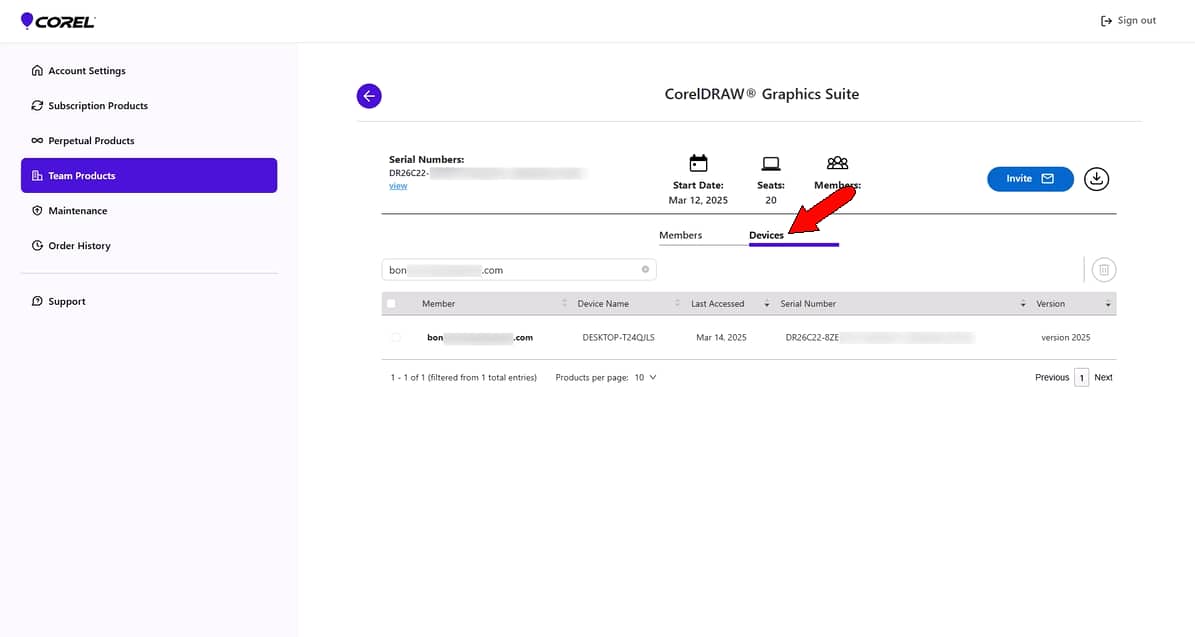
Once installed, both the admin and the team member can see the device listed under the license details.
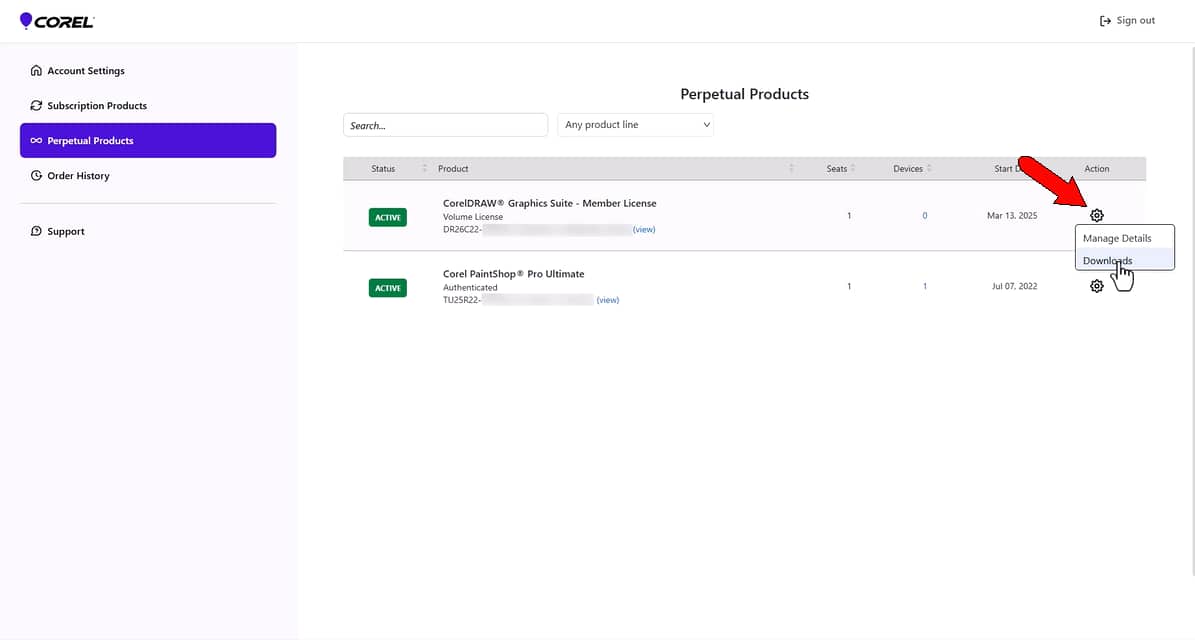
Because this is a volume (perpetual) product, details are found on the Perpetual Products page,
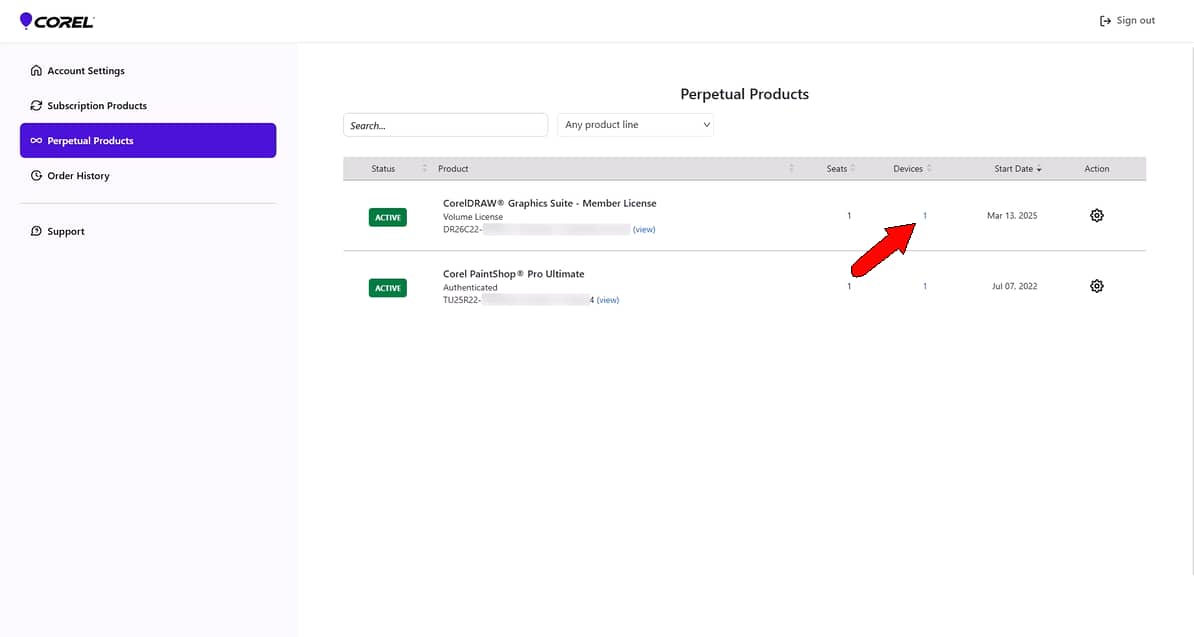
For the member license just sent, the team member has one seat assigned, but number of devices is zero because the product is not yet installed.

On the admin side, the invitation is no longer listed as pending, because the team member accepted the invitation and claimed one seat. Devices will be listed as zero until the product is installed.
If the team member needs the product download link, they can click the “Action” icon and choose “Downloads” to access the downloads page.
After downloading the correct product, they can install and register using the assigned serial number. After installation, the team member also needs to authenticate using their Corel credentials.
Now the team member’s member license shows one device claimed for the one seat.
4. Managing seats and devices
Now that licenses are assigned, admins can adjust seat and device management.
-
Managing multiple devices for one user: If you need to install the software on two or more devices, click the “Actions” icon and select “Member Details”.
![Manage devices]()
-
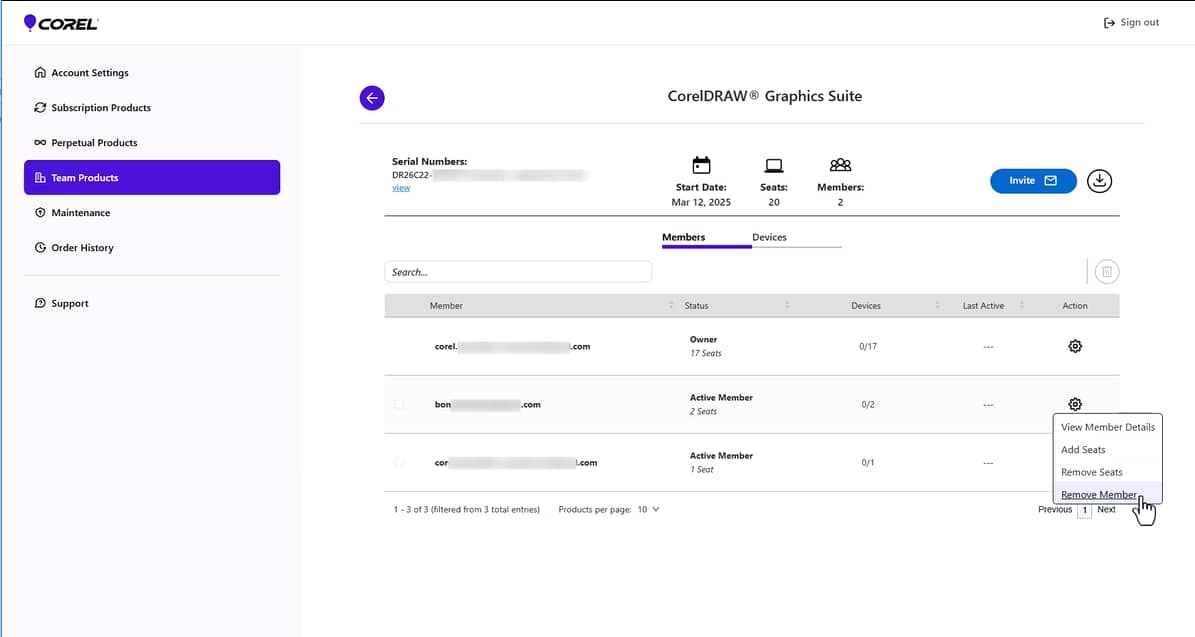
Reassigning licenses: To reassign a license, click the “Action” icon and select “Remove Member.” This releases the seat for reassignment while resetting any devices linked to that member.
This will return all seats assigned to that member back to the available total. The removed team member will no longer have access to any product on any device, though they could be invited back later.
![Remove member business license]()
-
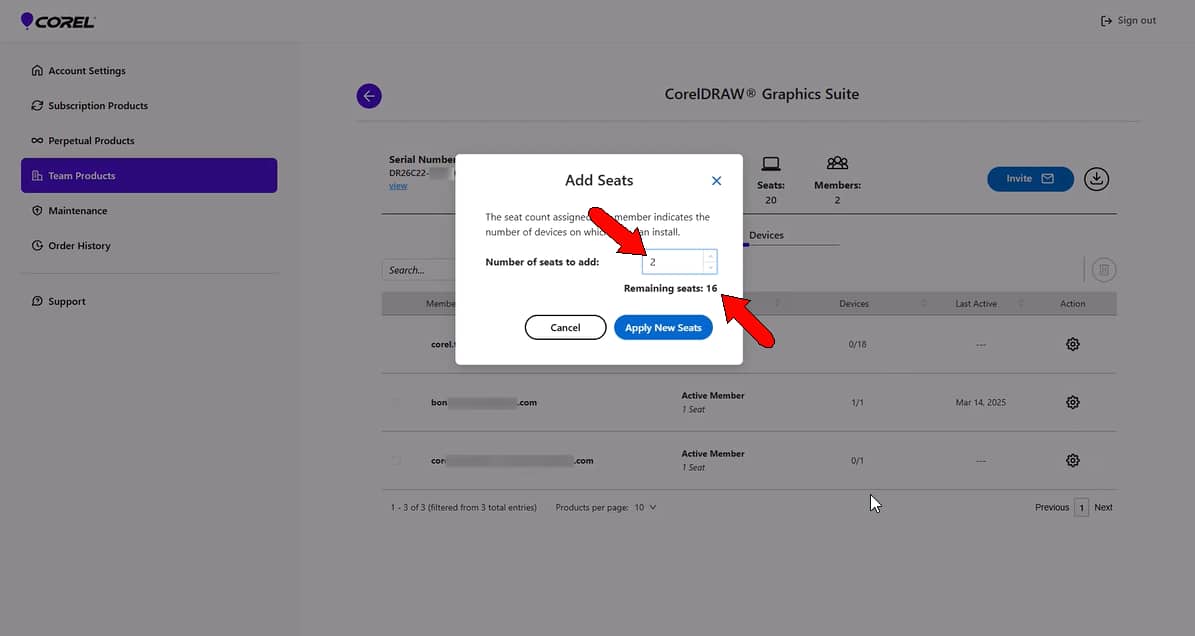
Adding seats: If the team member requires additional devices, click “Add Seats” and adjust accordingly.
![Add seats business license]()
-
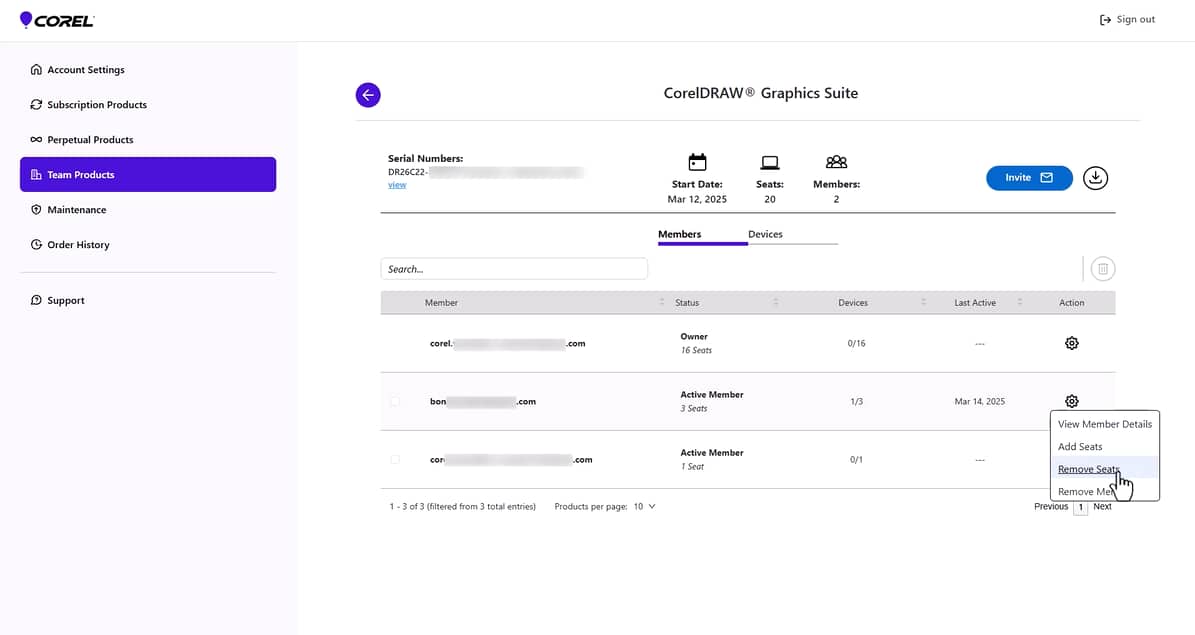
Remove seats: If you need to remove seats, click the “Actions” icon and select “Remove seats”.
Note that when a team member has one or more seats removed, all of their authenticated devices will be reset. This means that the user will need to sign into their Corel account again on each installed device that will remain active.
![Remove seats business license]()
-
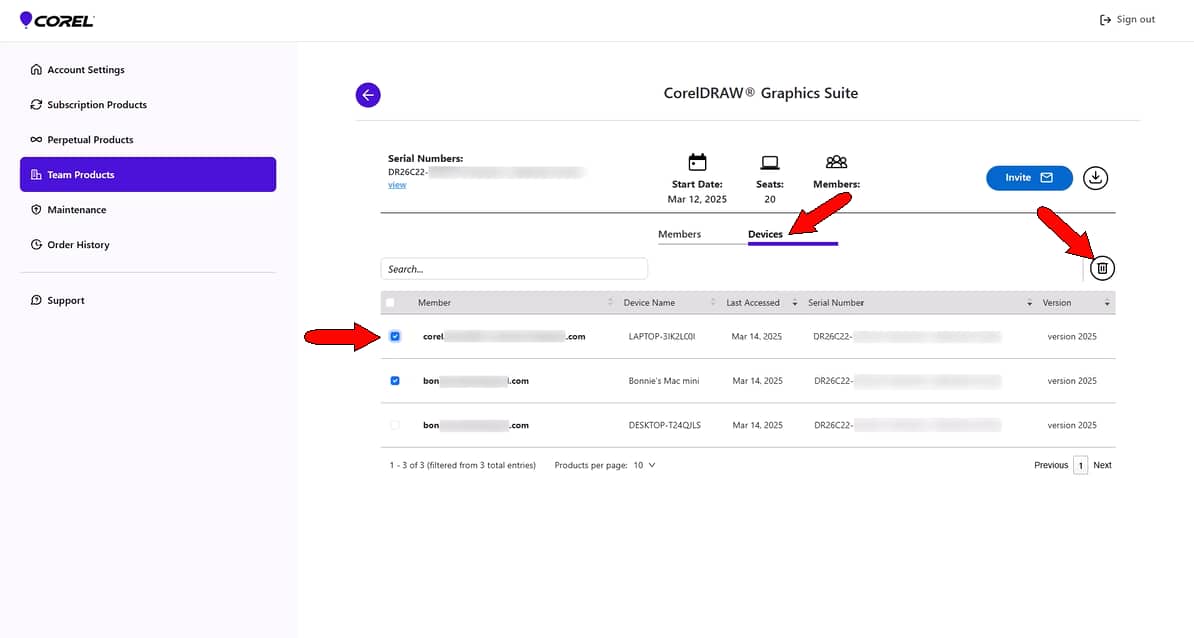
Device settings: Admins can view and manage specific device details, ensuring compliance with seat limits.
![Remove devices business license]()
5. Handling volume subscriptions for existing pre-2025 users
If your team already uses volume subscriptions:
-
Existing volume subscription licensees will initially find their subscription licenses in the “Subscription Products” section of their account portal, with no action required yet.
![Subscription products business license]()
-
Open the “Devices” tab and deactivate all previous installations for a clean slate.
This will deactivate all existing installations, and team members will be asked to sign in when they next launch their installed product.
![Activate devices business license]()
- Invite team members as described above to assign seats and enable new installations.
-
Devices already assigned to users will be automatically updated once they log in with their Corel account.
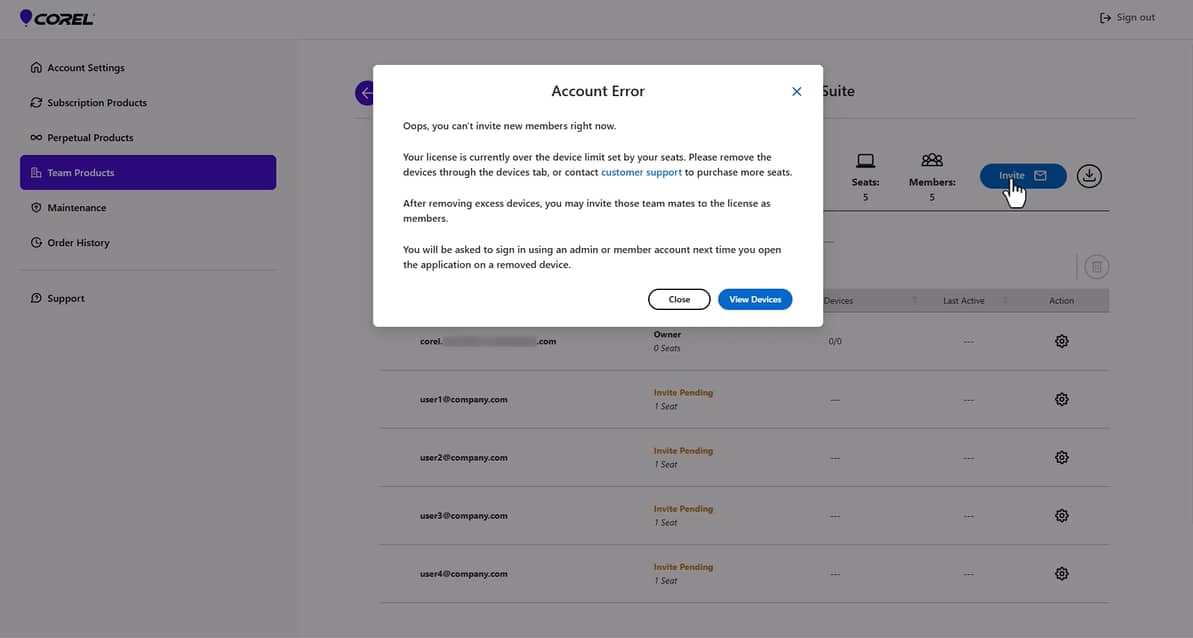
If the previous multi-seat subscription license had more registered devices than active seats in the subscription license, a device number warning will appear.
All users will still be able to access the installed product on devices already registered.
But admins will not be able to assign additional seats to other team members, or let team members install the new product version, as long as the current license is in excess use.
![Business license error]()

This ensures an easy transition to new licenses while maintaining compliance with your current subscription.
FAQs
Can team members be assigned multiple seats?
Yes, admins can assign additional seats to team members who need to install the software on multiple devices. Keep in mind that this will reduce the total number of available seats in your license.
How many devices can a single license cover?
Each license (seat) can be used to install the software on one device. Additional installations require extra seats.
What happens if a team member exceeds their device limit?
If a user attempts to install the software on more devices than their assigned seat allows, they will receive a “device number exceeded” warning. The admin can resolve this by removing redundant devices or assigning additional seats.
What happens when a member is removed from the team?
When you remove a team member, all associated seats and devices are reset. This frees up licenses for other team members while removing their access to the product.
Is there a limit to seat invitations?
You can only invite as many team members as there are purchased licenses. Each seat is tied to one member and device unless additional seats are assigned by the admin.
Empower your team with CorelDRAW Graphics Suite
From simple license activation to detailed seat tracking, this system empowers your team to focus on creativity and productivity without the logistical headaches.
Got more questions? Check out our CorelDRAW community or more tutorials.