The Contour command adds a parallel bounding shape, or shapes, to a selected vector or text object. We shall be looking at the different settings available for achieving a variety of contour types and we’ll discuss about where and how they can be used.
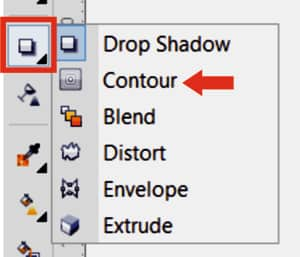
The Contour tool is available on the Effects flyout present on the Toolbar (hold the black triangle on the Effects button to reveal the flyout). Pressing Ctrl + F9 will open the Contour docker, or else this can also be opened under: Effects > Contour on the Menu bar.

Contours can be applied to a vector or an Artistic Text object.
Once the contour has been added to an object, you can change the settings on the Property bar to get the desired results.
Contour applied (Contour Type: Inside Contour, Contour Steps: 9 Steps, Contour Offset: 0.5mm, Corner: Mitered contour, Contour Fill: Red fill, Outline: No outline).


Contours can be separated by the Break Apart (Ctrl + K) Command. The object will be separated from the contour shapes that were created equal to the number of steps defined. The contour objects will be grouped together on breaking apart.
Step 1: Artistic Text object with Contour applied (Contour Type: Inside, Contour Steps: 1 Step, Contour Offset: 1mm, Contour Corner: Mitered contour, Contour Fill: White fill, Outline: No outline).

Step 2: Break the contour apart by pressing Ctrl + K. The text object and the contour will be separated. (The color of the contour shape has been changed here from white to blue for better visibility).

Step 3: Now keeping the original text object and the contour object in their place, duplicate (Ctrl+D), and horizontally shift the original text object. The sky blue object below is the duplicate of original red text object but horizontally shifted.

Step 4: Use the sky blue object (duplicate), to trim the white object to get the final result as shown below. (To trim, select both objects and click on the Trim icon in the Property bar). Once done, the sky blue object can be deleted.

This may need some extra skills to create the required shapes and choose the right colors for creating perfect shading.
Below is a colored Illustration with contours used on different shapes to create the shading effects. There could be a few objects in the illustration where some other effect, for example a Blend, is used.

Looking at the color illustration, you will find a few areas with color shading which creates a simulated 3D effect in the illustration. Most of the color shadings in this illustration are created using different shapes and contours with different settings. Compare the colored illustration with the wireframe to understand the areas where the contours may have been applied.
Color Blend: There are three different options a user can set to blend the colors between the color of original object and the color set for the contour. Fill color and the outline colors will be blended as the case may be. Color blends can be set to a) Linear, b) Clockwise, or c) Counter clockwise.
Acceleration: By using acceleration, you can set the rate at which the contour changes the shapes between steps. You can also set the acceleration for color in the Contour docker.
Contour Corners: Contour corners can be set to get mitered, rounded or beveled corners.
In addition to simulating 3D effects, contours can be used to create cuttable outlines for outputting to devices such as plotters, engraving machines, or vinyl cutters. Contours can be used for creating a bleed for the objects used in artworks for offset- or silk-screen printing.