The Pixel view in CorelDRAW lets you create drawings in actual pixel units, providing a much more accurate representation of how a design will appear on the Web.
In this tutorial you will learn how to:
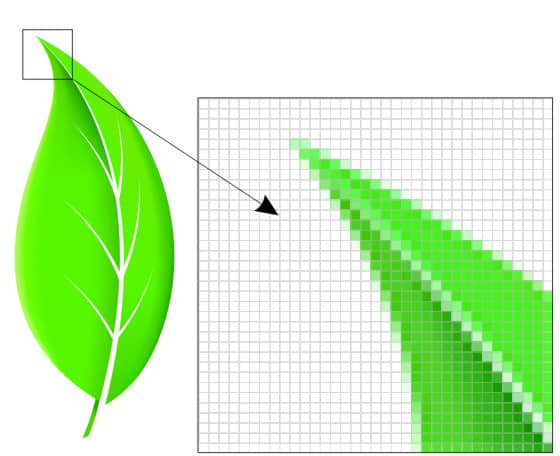
Pixel View displays a pixel-based rendition of the drawing, which allows you to zoom in on an area of an object, then position and size the object more precisely. This view also lets you see what the drawing will look like when it is exported to a bitmap file format, even if the objects are vector.
As you move around the grid, notice how you are presented with snap points, such as pixel edge, pixel corner, and pixel center. This allows for more precise control.
To change the color and opacity of the pixel grid, Click View > Setup > Grid and Ruler Setup
By using the pixel preview mode when designing for the Web, you can ensure that what you see is exactly what you will get. There’s no longer any need to guess.
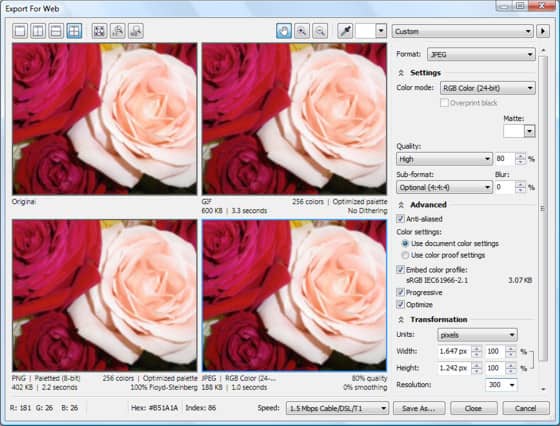
The Export for Web dialog box provides a single access point for common export controls, eliminating the need to open additional dialog boxes when preparing a file for export. It also lets you compare the results of various filter settings before you commit to an output format, making it easier to achieve optimal results. Let’s take a look. The image below is the Export for Web dialog box. This feature is available in CorelDRAW® and Corel PHOTO-PAINT®.
The Export for Web dialog box
CorelDRAW and Corel PHOTO-PAINT allow you to export the following Web-compatible file formats: GIF, PNG and JPEG.
GIF
GIF images are best used for line drawings, text, images with few colors, or images with sharp edges, such as scanned black-and-white images or logos. GIF offers several advanced graphic options, including transparent backgrounds, interlaced images and animation. It also lets you create custom palettes for the image.
PNG
PNG files are best for various image types, including photos and line drawings. The PNG file format (unlike the GIF and JPEG formats) supports the alpha channel. This allows you to save transparent images with superior results.
JPEG
Photos and scanned images are best exported as JPEG files. JPEG files use file compression to store an approximation of an image, which results in some loss of image data, but does not compromise the quality of most photographs. You can choose the image quality when you save an image — the higher the image quality, the larger the file size.
You can export Web-compatible files using preset settings. This allows you to optimize the file, without the need to modify individual settings. However, you can also customize the settings to produce a specific result. For example, you can adjust its color, display quality, and file size. Being able to use presets is useful if you are exporting a number of images and want to ensure consistency throughout your project.
From the Export to Web dialog box, choose JPEG from the Format list box. You have the option to perform one or more of the following tasks:
Settings Area
Control Color Mode, Quality, Sub-format and the ability to Blur the transition between adjacent pixels of different colors. Also in the Settings area are the options to overprint blacks when exporting to CMYK and apply a matte color to the object’s background to help blend the edges of anti-aliased objects.
Advanced Area
To load the JPEG file gradually in certain Web browsers so that it displays only portions of the image before it finishes loading, enable the Progressive check box. Use the optimal encoding method to produce the smallest JPEG file size and apply the document-color settings. You also have the color-proof settings.
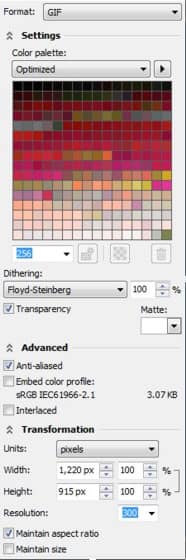
From the Export to Web dialog box, choose GIF or PNG from the Format list box. You have the option to perform one or more of the following tasks:
Settings Area
In the Settings area, choose a color palette, specify a dithering setting, and you can also sample a color and add it to a color palette by clicking on the Eyedropper tool. This is especially helpful if you have reduced the number of colors in an image (to reduce file size) and realize that a specific color is missing that you would like to add. One other feature here is that you can double-click on any of the colors visible, and modify them.
Advanced Area
Here you have the ability to set the image to be Anti Aliased, embed the color profile or set it as interlaced.
Now, I should point out that if you are sending out the file as a 24-bit RGB PNG, not all of these options will be available. For more information on this topic, look to the help files within CorelDRAW or Corel PHOTO-PAINT.